
Sargent Steam Cleaner Training
Filling and Heating
- Use the filler bottle to put 2-3 bottles tap water in the top opening
- Never add anything other than tap water – NO soaps, NO oils, NO chemicals, etc. inside the tank
- Plug electrical cord into a grounded wall outlet
- At the welcome screen, push the power button to heat
- Green steam light flashes as it heats
- Green steam light glows solid when fully heated – 6-8 minutes
- Remove cap to add water at any time
- If it runs dry, the center red light glows, buzzer sounds and panel says H2O
- Add 2-3 bottles of water and keep steaming
Attachments and Pressure Settings
- Lift front door – insert hose post up – secure loop over post
- The right hose button lets you choose steam pressure settings
- 1 click for low – 2 clicks for medium – 3 clicks for high
- Click once more for No Steam
- Pull the trigger to steam
- For a quick blast of HOT water, press and hold the left button while pulling trigger
- Push any attachment into the hose until it clicks
- Depress the side button to remove attachments
- Push detail brushes onto the steam nozzle
- Wrap any brush with cloth for one-step cleaning
- Use soft bristles on surfaces you don’t want to scratch)
- Use stiff or steel bristles to scratch away buildup
- Wrap steel scrubbing sponge over brush to add abrasive power
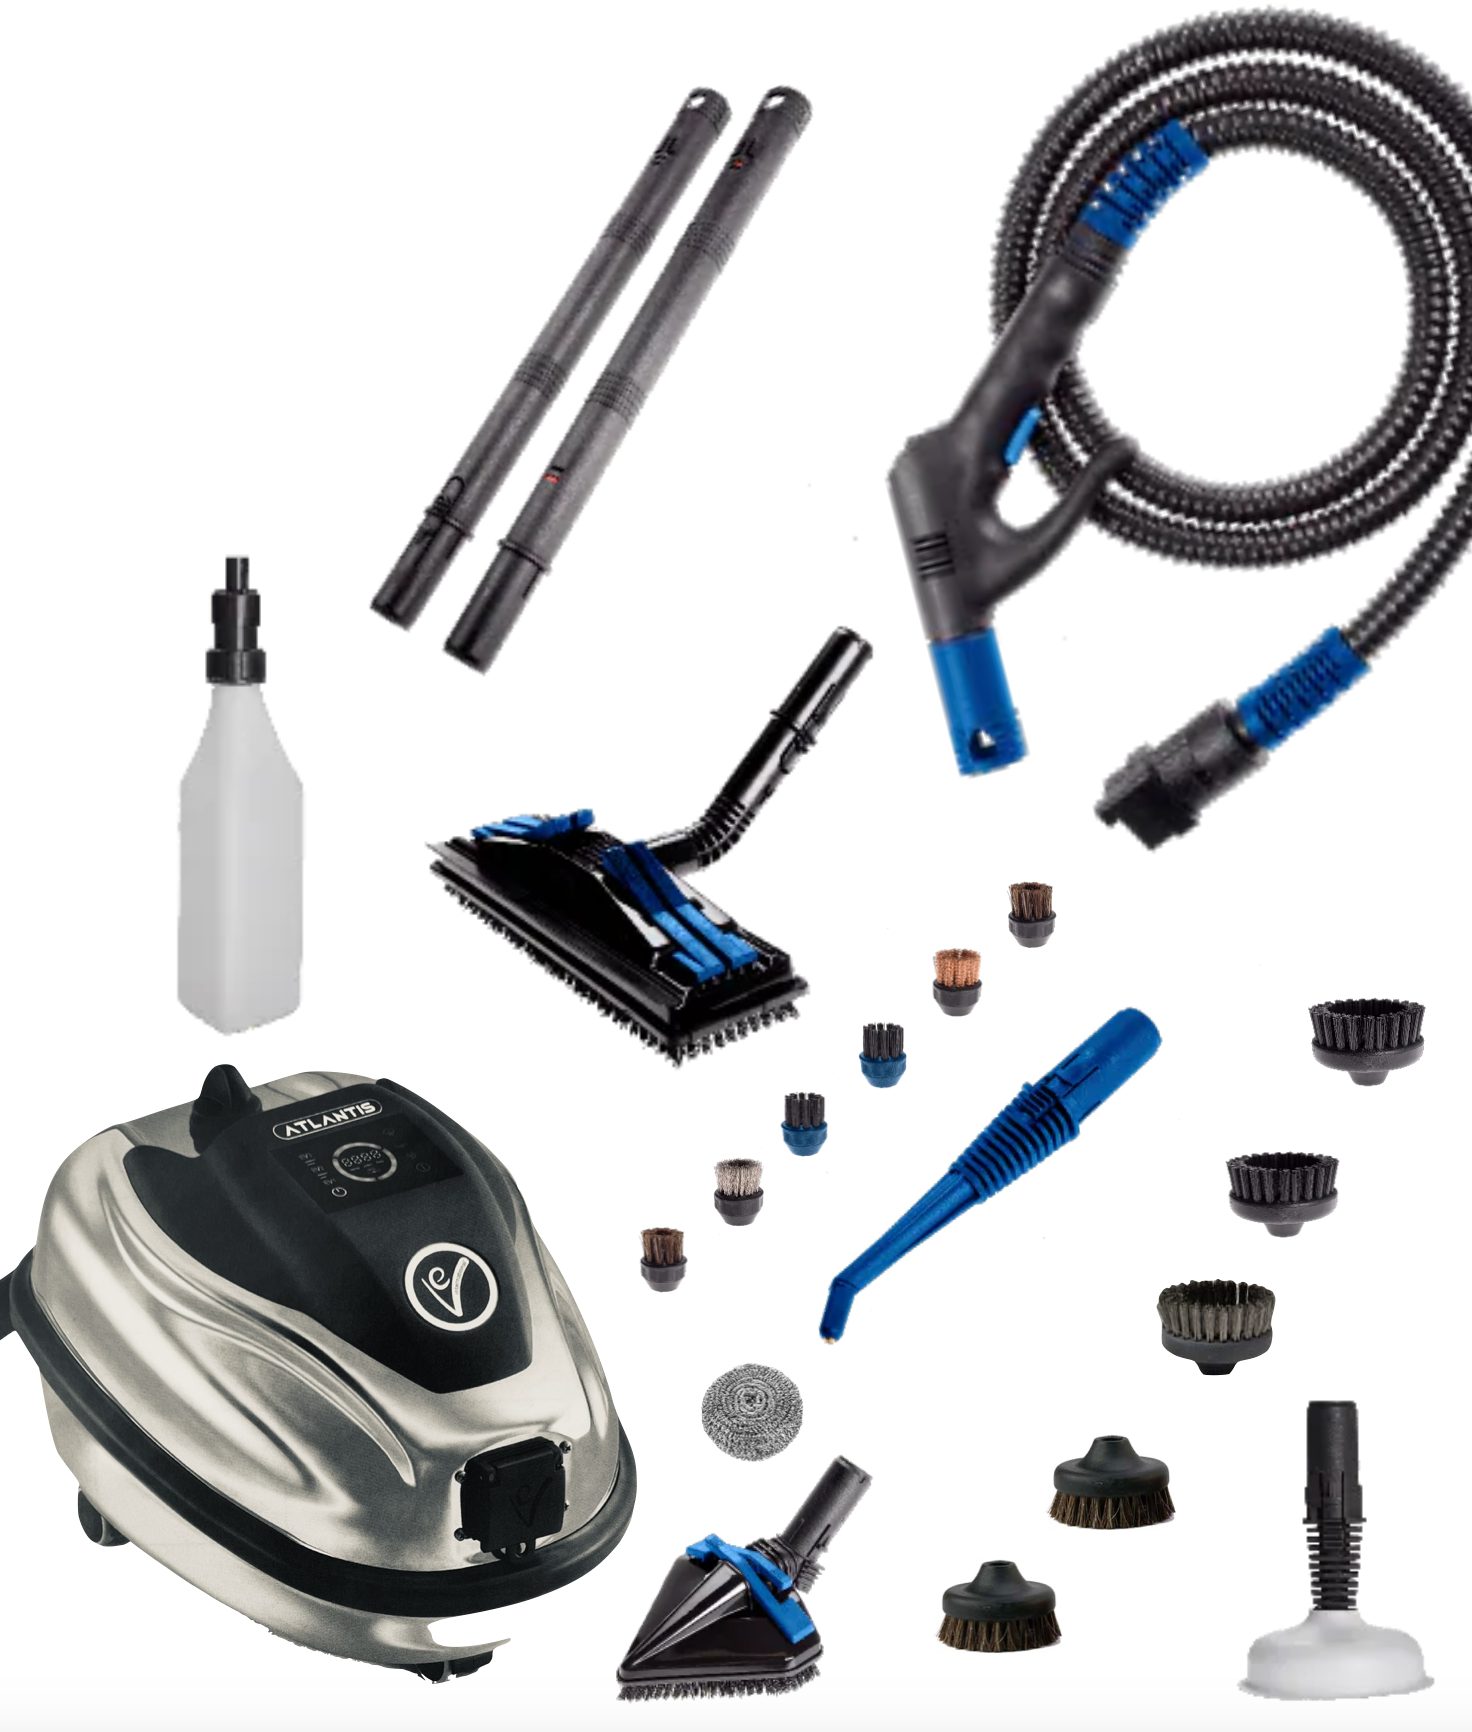
Atlantis System Includes
Names for Each Accessory
- Steam Generator
- Hose
- Extension Wands (2)
- Rectangle Floor Brush
- Triangle Brush
- Filler Bottle
- Steam Nozzle
- 1 & 2 inch Detail Brushes (soft, stiff and steel bristles)
- 4 inch Drain Cleaner
- Steel scrubbing sponge
Descaling – Mineral Flush
Assign one person per store to maintain the unit and perform the quarterly (every 3 months) descaling procedure
- Begin with a cold machine – disconnect power cord
- Remove plugs from bottom and top openings – drain water from boiler tank into the sink
- Turn the unit over and drain water from the auxiliary tank
- Replace drain plug into bottom opening
- Add 1 filler bottle of citric acid/water to the auxiliary tank
- Let solution sit in the auxiliary tank for 10 minutes
- Turn machine on – pump will fill the tank with citric acid/water
- Turn power switch off – let it sit for 4-6 hours
- After 4-6 hours, plug in the hose but do not turn on the power
- Press the hose switch to release any pressure through hose
- Disconnect both the hose and the power cord
- Remove plugs from bottom and top openings – drain dirty water from both tanks
- Replace drain plug into bottom opening
- Add fresh clear water to the top opening
- Turn on power button – heat and commence steaming
- Watch the video above for complete visual instructions
Best Practices and Cautions
For your safety and to prolong the life of the unit
- This steam cleaner produces extreme heat – nearly 340 degrees. Use with caution
- Do not burn yourself or melt surfaces. Steam rises – keep hands/face at safe distance
- This steamer functions under tremendous pressure
- Do not spray steam directly into LCD panels, touch screens or computer monitors
- TAP WATER ONLY! Never put anything but water in the steam cleaner
- No soaps, oils, fragrances, chemicals, etc. It only clogs the valves
- Evidence of ANYTHING other than water in tank voids warranty
- Always use the filler bottle. Do not let water soak electronics, gauges or insulation
- Do not immerse steam cleaner or hose in water. Attachments/brushes may be submerged
- Do not allow steamer to bang into walls or fall off an elevated surface
- Wheels and insulation may crack if dropped or crashed against a hard surface. (This repair is not covered under warranty)
- Do not steam near smoke detectors or fire sprinklers – they detect steam vapor as smoke
- Do not pull electrical plug out of the wall socket before turning off the power switch
- Do not pull the plug out of the wall from an angle. The ground post will not bend
- Do not pull your steam cleaner er by the hose – especially when it’s hot and pliable
Melt Through Sugary Buildup
- Display cabinets and glass fronts inside an out
- Prep and package counters
- Cookie Machines
- Floors and walls
Clean and Sanitize
- Cutting boards and knives
- Unclog drains
- Stainless steel counters, refrigerator fronts
- Ovens inside an out
Eliminate Odor-Causing Bacteria
- Refrigerators and glass fronts inside an out
- Shelves and racks
- Floors and walls
- Refrigerator coils
Clean and Sanitize
- Milk spills
- Unclog drains
- Doors and handles
Eliminate Odor-Causing Bacteria
- Prepared food display cabinets and glass fronts inside an out
- Prep and package counters
- Unclog drains
- Floors, tile grout, walls
Clean, De-grease and Sanitize
- Cutting boards and knives
- Sushi stations
- Ovens, grills, cooktops, fryers, soup machines
- Hoods, vents
Eliminate Odor-Causing Bacteria
- Seafood and meat display cabinets and glass fronts inside an out
- Prep and package counters
- Meat grinders
- Floors and walls
Clean and Sanitize Simultaneously
- Cutting boards and knives
- Unclog drains
- Protein spills
Clean and Sanitize
- Toilets and Urinals
- Sinks & counters
- Floors and walls
- Mirrors
Eliminate Odor-Causing Bacteria
- Stall doors and walls
- Unclog drains
- Doors and handles